
So I
finally had the finances to upgrade my grinder. For a long time I have been
longing for a Mazzer.
At German
Ebay I found a very good looking Super Jolly, and I won the auction at a
satisfying price compared to many other sites with used goods.
The grinder
is a doser model, I decided to make all the doser mods as a start; elvinator,
sweeper, inverted cup etc.
But no
matter what I did, it seemed to make a big mess, and I really like the
convenience of doserless.
I starting
looking for at conversation kit, and found some websites with all the parts,
but the price were at least 220$ for the kit. That’s way more than I would ever
spend on a piece of aluminum !
I searched
other coffee forums and came across a link to pictures involving this….

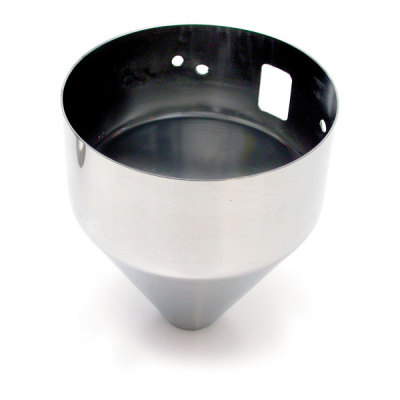
It’s a
fudge funnel, and it’s almost the same size as the original Mazzer Mini funnel,
just 1 cm bigger in diameter, but that’s not a problem.
A Danish
guy already had made the modifications to his major. Inspired by this project,
and the fact that the fudge funnel costs 17 euro, I ordered the funnel from
Germany. They call it a liqueur funnel.
Cutting and Shredding
First thing
is to take of the handle. It’s jointed on with little point weldings. The trick
is to get at sharp flat headed screwdriver in between the funnel and the
handle. As soon you get a little opening, put the screwdriver to one of the
sides and give it a good bash with a hammer. When one welding is cut open, the
rest will come easily.
.JPG)
.JPG)
When I took
of the doser, I drew the chute and screw holes on to some transparent paper.
This way I can easily draw over the places to cut and drill.
I placed the paper so that, the upper edge of the funnel is 5 mm under the edge of the grinder.
.JPG)
When the
holes are drawn to the funnel, use a metal drill. Make sure it’s sharp;
otherwise it will melt quickly against the stainless steel.
.JPG)


Now it’s
time to make the exit hole in the funnel – how big to make it, is a matter of
opinion. It took of about 15 mm in the length, but later on I have taken an
additional 15 mm because the coffee came to close to the exit and produced a
little static. To cut it off I used the jigsaw again, but I would recommend a
angle grinder instead, with a thin disc in it.

To finish
of I used a fine metal file, to take of all the sharp edges and make a nice
finish.
I was able
to reuse the gasket from the doser, but after some trial and error taking of
the doser several times it broke. I haven’t put in a new one, and I can’t seem to
feel a huge difference without the gasket.
Mount the new
funnel to the grinder and start shooting. Some grinders need a static grid or
another device to slow down the coffee; it usually depends on humidity and
types of coffee. Right away I could see I needed one.

I was also
able to use the original lid from the doser, but because the diameter in the
funnel is a bit bigger, the lid now goes inside, instead of resting at the
edge. I attached some knobs to put under chair legs for the lid to rest on.

I am super
happy with the result. It looks just as good, as an original funnel from Mazzer
in my opinion. And the quality of the end product is really god as well!