Sunday, August 19, 2012

Attento Thermometer by Espresso Gear

Attento Thermometer by Espresso Gear

The Attento Thermometer is created by Espresso Gear and has been a cheap guidance for my journey off steaming perfect micro-foam - considering the price off the gadget versus a micro-foam course.

Espresso Gear began its journey in 2000 with funder Lars Wallin. Espresso gear is a Swedish invention, design and production company, focusing on the contemporary specialty espresso market. Whether you´re a seasoned barista, home brewer or an espresso enthusiast, products at Espresso Gear have been specifically designed to make the entire espresso making process pure fun. Espresso Gear´s incredibly crafted barista tools including tampers, knock boxes and frothing thermometers help you create consistent shots and creamy, velvety milk again and again.
The Attento is a thermo-label, which you stick onto your favorite pitcher - I have chosen my Steel Series pitcher, because off the thin sides so the thermometer can reveal the actual temperature inside the pitcher.

The label has liquid crystal slots, which indicates the accurate temperature by turning black from green (shown in the above picture) - a pros of this particular thermometer is that is shows the exact temperature versus standard frothing thermometers that suffers from delays. These standard thermometers is often up to several seconds out of sync with the actual temperature of the milk, which the Attento also can be if placed upon a Motta pitcher with thick sides.

The delay time of the standard frothing thermometers is a natural effect of all probe thermometers, which isn´t the case with the Attento, because the liquid crystals don´t wait to turn black when a certain temperature have been reached, they react instantly.

Another pros towards the Attento is that is stuck upon your pitcher - perhaps your favorite pitcher - and will therefore always be with you in the challenge of producing perfect micro-foam - compared to the standard thermometers, which is often left hidden in the drawer. In other words, once you have put the Attento on a pitcher it stays there for years to come, showing the temperature of every latte you serve day in and day out.

The Thermometer is dishwasher safe

The Attento thermometer is of course dishwasher safe, so you finally can secure the quality of every latte drink you serve. Highly durable, professional quality - the Attento quick becomes a must-have in the frothing process and will sharpen your skills within a couple off times.

In other words, my standard thermometer has never been used since.

// Hendrup

Thursday, August 16, 2012

E61 Thermosyphon

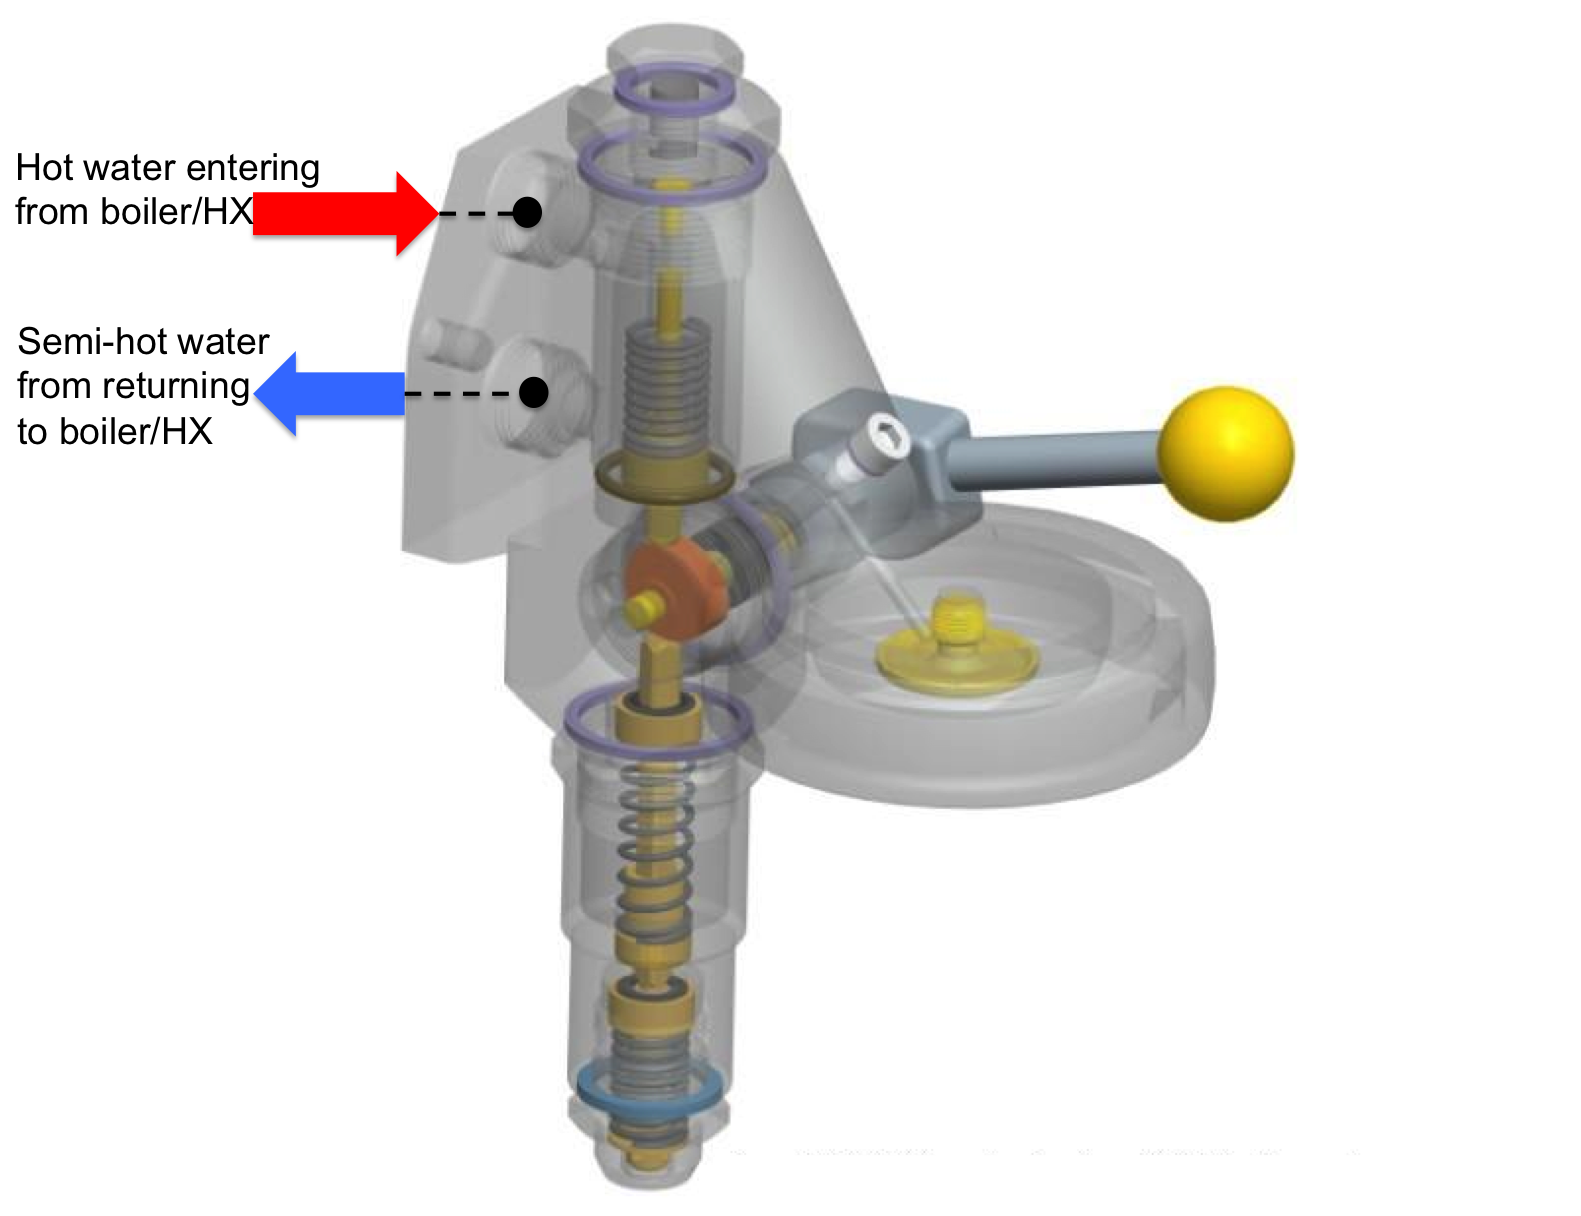
Thermosyphon system with E-61 group

The E61 Thermosyphon (the process that keeps the group hot) is quite simple, but perhaps not always clearly understood. It is however, important to ensure your shot is extracted at the right temperature to make the perfect espresso. The graphical picture above shows where hot water enters/leaves the chamber at the top of the group. This hot water can be taken from high up on the boiler of a single boiler (non-HX machine) or directly from the top of the heat exchanger on a HX machine.

The water returns to either a lower point of the boiler or heat exchanger and because it has given up some heat to the group - it sets up a convection current which starts water slowly circulating from boiler/HX to group and back.

Only the portion of the group shown above the brew group area - actually has water circulating within it. The heat travels to the rest of the group by simple conduction through the brass of which the group is conducted.

I think that a general mistaken impression could be that the space within the group, where the hot water circulates, is much larger than it actually is - another point to remember is that this chamber is far from empty, because it also has the E61 "mushroom" assembly inside it.

The far point of the group (the bit you lock your portafilter into) reaches about 90 degrees when brew-able in a HX machine and will be a little cooler in a non-HX machine. Any machine whether single boiler, HX or dual boiler, should always have the group (where the portafilter locks in), at a lower temperature than the brew water.

NOTE: the temperature of the E61 group can be further managed by the use of various "thermosyphon restrictors", really little plastic washers with different sized holes in them placed in the pipes leading to and from the group.


// Hendrup


Monday, August 13, 2012

Moka Pot by Bialetti

The little man with the mustache is the Bialetti macot

History
The "caffettiera", "macchinetta del caffé", "Italian coffee pot" or "moka pot" is a stove top coffee maker, that produces excellent coffee by passing hot water pressurized by steam though ground coffee. During the 1920s Bialetti noticed the laundry methods used by local woman - the wash was boiled in tubs with a central pipe in the middle, this pipe would draw the soapy water up and redistribute it over the laundry. Bialettis creative mind brought him to the conclusion that a simple coffee machine could be fashioned on this model and could produce almost espresso coffee in private homes.

At this particular time, other Italian coffee firms were busy trying to create new and better ways to brew coffee - using pressure rather than steam to extract the best from the coffee beans. Nevertheless the high pressure - lower than boiling water solutions of companies like Gaggia were to take years of developing.

These modern "true" espresso machines would remain fairly large and costly, using complex systems to attain their superior results. Italians were still used to the steam pressured "espresso" machines that dominated the coffeehouse scene and were therefore open to simpler solutions that would give them the same style coffee at home.

The Bialetti moka pot, model Elegance

In 1933, after some years of tinkering and solving technical problems Alfonso Bialetto invented the Moka Express. Bialett´s coffee machine, made of Aluminum, was similar in shape and design to silver coffee services popular in well to do homes. Thus he combined modern technology with the Italian tradition for elegance and craftsmanship. The Stovetop "espresso" machine was simple and compact, yet capable of making the power packed brew associated with the large espresso machine of the espresso bar. The express claim of Bialetti was that "without requiring any ability whatsoever" yet one could enjoy "in casa in espresso come al bar" (an espresso in the home just like one in the bar).

It hereby first patented by Luigi De Ponti for the Italian firm Bialetti in 1933, that today still produce this specific model under the name - Moka Express.


The Moka pot has become very popular in Europe, but also in Latin American countries and has also become an iconic design, which is displayed in modern industrial art museums, such as the Museum of Modern Art, the Cooper-Hewitt, National Design Museum, the Design Museum and the London Science Museum.

Moka pots have been design in many shapes since its patent in 1933 and come in different sizes - mostly of the current models incl. the original design are made from aluminum.


Water chamber and coffee basket

Seeking espresso
If you are seeking true espresso, then be prepared to spend several hundred dollars on a high-quality espresso machine, like you see in restaurants or cappuccino bars. These machine use high-pressure water to produce the espresso versus some home machines (even the $100 models found at ex. Wal Mart and other places), do not produce enough pressure to create espresso like you find in a coffee bar.

A very reasonable alternative for home use is an "espresso pot", called a moka in Italy. The moka is a simple device that uses steam pressure to force water through a strainer to make espresso. It won´t be exactly like the espresso you find in bars, but it can come close. The moka pot is an inexpensive alternative of making good caffe.

"Be aware of this brewing method, because a 2-ounce shot holds the same caffeine level as an 8-ounce cup of drip coffee." 

Ground coffee filled into the filter

How to brew
The moka pot is a very simple device, but nevertheless is including a full step-by-step brewing guide below;

1. Fill the espresso pot with cold water. The inside of the pot is usually marked with a line to show the fill level. If not, then fill it up to the relief valve on the side (the water should not seep wrought the strainer when you insert it). This will waterlog the coffee and possibly affect the flavor.

2. Insert the strainer assembly into the base. (alternately, you can fill the assembly first, then insert it - it´s a personal preference)

3. Fill the strainer with ground espresso coffee. Ensure that you do not get any ground on the outside rim of the container. There must be a perfect seal at this point or else the water will spew out once it begins to boil. Simply wipe any excess grounds off before assembling the pot. This is one reason why some people fill the strainer first then insert it.

Warning: Do not pack the espresso down! This could possibly clog the system and generate too much pressure. Although acceptable for commercial machines, packing the espresso in this type of pot can be dangerous.

4. Assemble the pot. Once again, ensure that no grounds are on the outside rim. Screw the pot onto the base by holding the pot itself, not the handle. The handles can break easily - depending on the model (but is also replaceable).

5. Place the pot over a low flame. A low flame increases the brew time, which enhances the flavor - at a later step, you´ll want a slow trickle of espresso instead of a full-force fountain.

In some of the below pictures, you´ll notice a small metal piece under the pot. This piece is common for Italian stoves and is available at any hardware store.

6. You should see some coffee begin to emerge and then suddenly see a cough or perhaps sneeze of coffee with a puffing sound that goes along with it. Soon after this, coffee will begin to come out int a steam. The steam should begin as a rich red-brown and progressively get lighter in color. Once the steam has become the color of yellow honey the brewer should be removed from the heat source and the lid closed. Use hot pads to avoid getting burned.

7. Wrap the bottom of the pot in a chilled bar towel or run it under cold tap water. This will stop the extraction, resulting in coffee that is sweeter and more full-bodied. It will also decrease the odds of the coffee developing a metallic taste. The idea is to get a relatively small amount of coffee, which has very concentrated and rich flavors.

8. Wait until there is no more coffee coming out, then pour into cups. If you have more than you are going to drink at once, pour the excess into a thermal carafe, because leaving it in the brewer will result in a bitter and harsh tasting coffee.

Assembly the moka pot for brewing
Moka pot on heating source


Cleaning
After every use: Empty the spent grounds from the coffee basket, wash out the base and run water out the collecting chamber. Dry everything with a rag and let the three pieces dry separately. This will avoid having a dank, odorous smell later - after an hour, everything should be dried enough to assemble it back together.

After two-three weeks: Time to disassemble and wipe everything down, including the coffee oils that we have tried to eliminate after each use. This cleaning includes popping off the O-ring and the metal filter. Take a blunt, flat knife and slowly work it under the O-ring, while trying carefully not to damage it - use a lifting motion to pop if off. Remove the metal filter, which should come off right away as the O-ring was the only piece keeping it in place.

Now that everything is disassembled, use a paper towel and wipe every inch of the pot. I advocate using a paper towel than a rag, because a paper towel seems to absorb more coffee oils. Additionally, you can see how dirty the moka pot really was. The only tricky part is getting the paper towel inside the spout of the moka pot - I use a small pencil of thermometer and wrap the paper towel around it, then inserting it into the grimy, small place.

Moka starts showing after five min. brew time
The brew is almost finish
The final brew

The stovetop moka pots make dark, dense coffee. Tasty (millions of Italians can´t be wrong) but it ain´t espresso and the crema will be minimal. The taste is in general more sweet, sirupy tasting - more of the light flavors can´t be achieved using this brewing method, but will produce a drinkable black moka.


// Hendrup


Friday, August 10, 2012

Diviso, a newly introduced coffee drink

A shot extracted from half espresso/Redespresso

The 15.02.2012 started a new adventure, because I received a package from Tekompaniet (a swedish tea supplier), the generous delivery contained two bags of 250 g. Redespresso, a serving spoon, a Redespresso filter basket and a magazine of the products offers by Tekompaniet. I´d only used one bag of the Redspresso powder, due to the capacity of the bag, but for a week ago I found the second bag in my kitchen closet and went experimenting.

First off, if you want to read some off the Redespresso reviews, click the links below;


Redespresso?
The adventure started back in 2005, because of Carl Pretorius´s habit of drinking too much espresso. Carl was supposed to take a coffee break, but one day he went in the kitchen searching for alternatives for an espresso shot, at that time the rooibos tea was fairly close to the espresso machine and he started experimenting. The course was set, he didn’t want a decaf or tea, but something with the health benefits of the tea. He found the right quality of rooibos tea and the right grind setting for the espresso shot and started serving for friends. The feedback was positive and this lead the rooibos cappuccino went on the menu, at some of Carl’s friends who owned a coffee shop. Redespresso was hereby introduced to the café environment and the awards started roiling in, actually the firm won five awards in just five years. Three of the awards was for the invention, including the first South African tea company to earn coffee´s highest honor at The Specialty Coffee Association of America (SCAA) by winning the Best New Product (Specialty Beverage Award 2008/09). In the same year, Tea Expo 2009 voted Redespresso as a Top Ten Best New Product, cause of their use of tea in untraditional way. In other words, this company have grown exponentially both in size and in reputation.

Red espresso consist purely of African rooibos tea and is patented grinded fine enough to be used in your own espresso machine for a nice shot of red espresso. If you don’t know what rooibos tea is, here is an explanation; Rooibos is definitely not coffee/espresso, as you might expect, it’s a tea extract and is sometimes known as bush tea or red tea. It’s originally grown in South Africa and holds no caffeine, but contains an antioxidant level that far exceeds tea or coffee. Therefore a con of this brewing is that its healthier, cause of the ten times more antioxidants than in normal rooibos tea. Quote Redespresso article   


The divided puck from a standard filter basket

The general idea was too create an espresso based drink, which didn´t contain a high level of caffeine, but instead where a drink that you could enjoy multiple times a day with an improved taste compared with a traditional cappuccino.

The answer came using my 18 g. VST filter basket, which I filled with 9 g. of ground espresso coffee as a bottom layer and poured 9 g. of Redespresso powder on top, with a following tamp. When I received the package from Tekompaniet it contained a special Redespresso filter basket, with fewer holes, so it could keep the resistants - therefore the idea was to press the ground espresso coffee in the bottom and thereby create resistance in a normal filter basket.

"The thought of this was to create an espresso drink with low caffeine with antioxidants and a coffee flavor in symphony with the fruity flavors from the Redespresso powder. It was a brilliant success!"

The top foam layer of the final drink

Taste and flavors
You might wonder whats so special about this particular drink compared with ordinary cappuccinos etc., and the answer is simple -  the full silk bodied texture combined with a traditional coffee flavor spiced with all the fruitiness from the Redespresso powder is truly amazing. The Diviso cup holds a very rich flavor, where the first flavors of traditional coffee appears, hereafter achieves the Redespresso signature by the taste off sweet herbs along with a lot of varies red berries.

Delicious brown-redish edge of the top foam layer

Redespresso contribute
The Rooibos grounded tea is very sweet and contains a lot of delicate flavors of herbs and black tea without a single note of bitterness. When brewed straight as an espresso shot, its extremely creamy and pleasant to drink - first off the taste is quite astonishingly, because you are left wondering what flavors you have tasted. Its therefore hard to narrow down the different notes that appear in this drink, because of the flavors being combined in a truly fusion.

In my world it was nothing less a revolution, a completely new paradigm between the world of coffee and tea. I have tasted all of these exact flavors before, but not in such a concentrated, creamy and silky way. I still wonder how ground rooibos tea can give away such deep, completed and attractive flavors - but its working.

Nevertheless joined with half amount of freshly ground espresso coffee, the ground rooibos simply lifts the flavors of the cup and gives away a beautiful, creamy and silk textured body.

The result next to the divided pucks

Name of the drink
The name originates from the italian word "Diviso", which plainly means "divided" - because of the separation of normal ground espresso coffee and Redespresso powder in the puck - which harmonizes in both flavors and texture of the shot.

* This is a world premiere of the Diviso and you will therefore not be able to purchase it at any coffee bar - but join and spread the word about this wonderful drink. If you haven´t tried the Redespresso powder, order a package here.


// Hendrup

Tuesday, August 7, 2012

Tiramisu

Amaretto, used liquor in the Tiramisu

History
The world known Tiramisu is also known as "Tuscan Trifle", which was initially created in Siena - in the northwestern Italian province of Tuscany. The occasion was a visit by Grand Duke Cosimo de´ Medici III, who brought the dessert back with him to Florence - the dessert later on became popular among the English intellectuals and artists who lived there.

The dessert where then brought to England, where its popularity grew, meanwhile the Tiramisu made its way to Treviso - just northwest of Venice, in the northeastern province of Veneto. Treviso is present known for its canals, frescoes and Tiramisu.

Whipped cream


Stories are told about how Tiramisu was the favorite of Venice´s courtesans, who needed a "Pick me up" (the literal translation of "tirami-su") to fortify themselves between their amorous encounters. True? Probably not - but is makes for a colorful history.

Its American popularity arose in San Francisco and today, Tiramisu can be found in restaurants throughout the nation.

The original recipe was called for custard and only recently has Mascarpone cheese been substituted - the basic ingredients are eggs, mascarpone cheese, ladyfingers, cream, espresso coffee, sugar, liquor and topped with cocoa or shaved chocolate.


Four espresso shot mixed with Amaretto

Ingredients (6 persons)
 Four eggs
 100 g. sugar
 0,5 vanilla pod
 500 g. mascarpone cheese
 4 dl. (13,5 oz) espresso coffee 
 1 dl. (3,3 oz) Amaretto (Almond liqour)
 Savoiardi cookies - ladyfingers
 Cocoa powder

Bottom layer - cream distributed evenly

Preparation
Extract some proper espresso shot by using either a moka-pot, Aeropress or a espresso machine - I made about four espresso shots, which got about 30 seconds each in brew time. Pour the extracted espresso coffee into a bowl and mix it gently with the Amaretto liquor.


Ladyfingers is soaked in espresso and Amaretto

Divide the eggs and set the egg whites aside (I use pasteurized eggs as a safety precaution). Mix the egg yolks with the sugar and vanilla seeds until a light and airy egg nog is achieved. You might have to stirrer for quite some time - afterwards carefully mix in the mascarpone.

Ladyfinger is ready for placing in the Tiramisu

Whip the egg whites until they are purely airy and mix it gently into the mixture off egg yolks, sugar, vanilla seeds and mascarpone.

Placing a second layer of soaked ladyfingers

The making
Congratulation, you are now ready to assemble the layers of the Tiramisu. You will need a elongated form, which you can place the first layer off distributed cream. The second layer will be off the soaked ladyfingers (soak the ladyfingers into the espresso coffee mixed with Amaretto) which shall cover the entire surface - if they doesn´t fit, break them into the needed sizes.

Third layer - distributed cream on top of soaked ladyfingers

First layer - distributed cream
Second layer - distributed soaked ladyfingers
Third layer - distributed cream
Fourth layer - distributed soaked ladyfingers
Fifth layer - distributed cream

* You can make as many layers, which is possible in your picked form.

Fifth and final layer off distributed cream 

Place a layer of distributed cream onto the layer of ladyfingers - keep this mixture of layers until the desired height is achieved. The top layer shall always be off distributed cream - and afterwards place the dessert in the fridge for at least 4-5 hours (happily over night).

Delicious Tiramisu

Before serving, simply apply some sprinkled cocoa powder on top of the Tiramisu - enjoy the most famous coffee dessert.


// Hendrup

Saturday, August 4, 2012

Rocket Evoluzione Giotto v2 Review, part II

The water supply switch, between plumbed or water reservoir

Performance
I do personally use the Evoluzione with its internal water reservoir and can therefore not comment on how the espresso machine performance when plumbed - but I will suppose that its doesn´t change anything. Nevertheless I have performed a steaming test with the Evoluzione Giotto v2 in the article - Comparison of Steam Tips - where different steam tips have been tested by the clock, to enlighten which steam tip, was the easiest and fastest to work with along with a specific type of milk. This specific test was performed in a single row, which clearly states how powerful the steam capacity of this machine is.


I have enclosed the Steam tip chart above for your convenience, so you can get the full picture off how powerful this machine is - and surely is the four hole steam tip the fastest choice, but more importantly is that the machine can pull this steam tip, because it lets the steam exit much greater than a two hole tip.

"The four hole tip is often represented in the most coffee cafes and is therefore thought off as a professional steam tip - this is because its currently the quickest steam tip at the market, that also can deliver the maximum result of great micro foam. Comparing this specific steam tip along with the two and three hole tips, the speed of the four hole will shine through when frothing for more than one cup of cappuccino." Quote from Comparison of Steam tips

The Evoluzione Giotto v2 machine can truly adapt with the four hole tip and easily make eight cappuccinos without any hesitation. This is also what I enjoy mostly about this machine - on the outside is the Evoluzione v2 designed like a true gentlemen with its classic and simple lines, but under the hood is kept a massive machine, which is ready for solving any possible task that you through at it.


Cup holder, with water reservoir behind

The Evoluzione v2 does come with a 4.05 kilo commercial brewing head and can therefore apply the absolute quality to your espresso shot - therefore will the shots be depending on the used grinder, because this definitely will limit the espresso machine. You will achieve great result with a Mahlkönig/Baratza Vario, Mazzer Mini or Anfim K2 grinder, but you will achieve an even better result with a better grinder such as a Mazzer Robur or Anfim Super Caimano and therefore will the shot quality depend on the grinder, because this machine is up for the maximum extraction of the ground coffee.

Steam wand tip on the Evoluzione

Price versus Quality
In my world the Rocket espresso machine is the market leader of Price versus Quality in their price range, exception off the Nuova Simonelli Oscar with brilliant technical components, (but still made with a plastic chassis) which is excess the Rocket competitive price range. You might wonder why Rocket is leading within this field, but where do you locate a hand built espresso machine with a staggering finish besides the Rocket machines? Well, to be honest is there a lot of competition on paper with brands such as; Izzo, Vibiemme and Nuova Simonelli - where they have almost the same internal components in the different price levels, but when you add the design the clear winner will be Rocket espresso.

I mean, if you look at a Izzo or Vibiemme espresso machine - the edges is very rough made, almost left sharp and unpleasant to operate with. The Izzo have some beautiful machines, but a rough finish and Vibiemme is next to ugly designed machines in my opinion. Nuova Simonelli doesn´t produce a lot of machines with a steel chassis, but is more active with plastic sides - which isn´t preferable when having the ability to choose quality steel.

Water tap on the Evoluzione

Summary
Im supporting the Seattle Coffee Gear enthusiasm for the Rocket espresso machines, because I simply can´t find any other espresso machine within the price range off 10.000-15.000 DKK ($1.660 - 2500) that possesses the same elegant design, which simply invite to heavy usage. When I suggest espresso machines to people who PM me, I almost recommend a Rocket machine every time (depending on their price range) - because I look at it as Apple within the computer market. Apple products works every time and is easy to operate and beside holds the most elegant design along with its high brand value (In my opinion), the same aspects as a Rocket espresso machine.


// Hendrup

Wednesday, August 1, 2012

Back from Vacation

Bye Bye Vacation

Im back on track after a two-week-vacation and I hope that you have enjoyed some off the articles that I´d prepared - there were about six very different articles from frothing guides to a coffee beer review, so if you haven`t catch one of these, then there are links attached below;
1. Frothing Guide, link. 
2. Beer, Cold Brewed Coffee, link. 
3. New Coffee Area, link.  
4. VST Baskets, introduction, link. 
5. Difference in Pitchers, link. 
6. Rocket Evoluzione Giotto v2 Review, part I, link.

All in on espresso extracting

Im ready to fill the blog with some newly achieved coffee knowledge, so you definitely wont get bored in the August month.  I have prepared some different reviews, both of espresso machines but also a great coffee treasure cafe from Venice and some delicious recipes.

// Hendrup

Sunday, July 29, 2012

Rocket Evoluzione Giotto v2 Review, part I

The front panel of the Evoluzione model 


When I first-handed received a Rocket Giotto Evoluzione (first version) for testing, there was no doubt in my mind, that I was up for a Rocket Espresso made espresso machine, when I was economical ready to upgrade the machine park.

This was even more clarified when I received a Rocket Giotto Premium Plus v2 machine (also for testing) – because it simply solved every single task that I put up fore it. You might wonder why this was such a logical purchase for me, without testing any further into the world of espresso machines? I was truly sold into the quality world of Rocket Espresso, where their products are made of the finest steel and greatest craftsmanship. This specific review of the newly purchased Giotto Evoluzione v2 espresso machine from Italian, Rocket Espresso will perhaps spread some of my enthusiasm in your way.


Top of the espresso machine


Design
Firstly I will focus on the design, because I find it extremely relevant when comparing espresso machines, because most of the espresso machines in same price range offers the same technical specs, so its left to the design and the “feeling”, when using the specific machine. This is also my point of view, because you will (if you are a true coffee nerd/enthusiast) use the machine on a regular daily basis and therefore will the design/feeling play a great part of how enjoyable this moment will be. 

Rocket Espresso is providing their machines with such finesse, that its hard to oversee when looking around at the espresso machines options – I mean the edges of the Rocket models isn’t just left rough and sharp, but is instead bended and fitted perfectly when assembled. This applies such a gap between a Rocket espresso machine and other available machines, ex. Izzo – that it definitely should be considered when purchasing your own dream machine.

Likewise is the steel color different from the available machines, because the Rocket machines possesses a goldish steel color versus the general cold steel color, but isn’t this a very small detail? Well, it’s an extremely small detail, but look at it from this angle – you will have to look at your machine every day, because it isn’t place-able in a kitchen closet.

Overall, the Rocket espresso machine models is possessing the greatest outer design, when talking the finish – no doubt about that and also has the greater looks when it comes to the steel used, but.! The Rocket has designed the water outtake a bit too close to the lever and therefore isn’t so operational as I would like it to be – for my personal use this isn’t a deep con, because I´m more into the cappuccino thing than a Americano – but for a Americano fan, this would be a considerable con.


Technical specs
           
            Bodywork                   Steel (AISI 304)

            Brewing head              Commercial brewing head (4.05 KG/ 9lb.)

Pre-infusion                 Dual pre-infusion system: mechanical pre-infusion system with progressively working piston and static pre-infusion chamber. (This reflects a smooth coffee extraction with optimum aroma, body and crema)

Thermo Siphon           Superior layout of thermo siphon design resulting in optimum extraction. With a 20% higher volume than comparable machine on the market, quote Rocket Espresso.

Boiler                          Boiler is made of pure copper (Cu 99,9%) with two lead free, heavy brass end plates. These brass end plates combined with the special additional boiler insulation increases the thermal retention by up to 50% versus other boiler systems, quote Rocket Espresso. (Boiler capacity 1.8 L.)

Pump type                   Full commercial rotary type pump (not vibrational type pump) with external pressure adjustment. 

Pressure control           The machines comes with a full size commercial rated pressure switch (0.35 degrees temperature differential tolerance)

Pressure gauges           One dedicated gauge for pump pressure and one for boiler temperature control.

Steam wand                With our cool-touch technology: anti-burn (only the nozzle gets hot) easy cleaning as milk doesn’t bake on wand; more efficient steam, as heat is not dissipated around the wand. Steam nozzle designed for easy milk foaming with fine texture.

Electronically              Microprocessor controlled automatic level control of boiler and fresh water reservoir, with low water level indication system.

Heating                       Optimized boiler capacity to thermo siphon system ratio. Results in fast heat up time with 1.200W element, made from special long life material. (5 times longer than normal elements)

Safety Valve                Fully certified commercially rated safety valve.

Water Supply              2.9 L fresh water reservoir or alternatively by turning the control switch, steel braided direct water connection (hard plumbed) with full drip tray drainage system.

Dimensions                 (W * D * H) 
                                    Rocket Giotto Evoluzione V2: 33 cm * 42.5 cm * 39 cm. (13.0 in * 16.73 in * 15.36 in)
                                    Rocket Cellini Evoluzione V2: 30 cm * 42.5 cm * 39 cm. (11.8 in * 16.73 in * 15.36 in)

Weight                         27.8 KG / 61.4 LB.

Additionally                Full size commercial one and two cup filter handles and baskets. One blind filter. Metal tamper. Microfiber towel. Group cleaning brush. Full training guide and instructions (CD and manual).


Next part of the review will be posted the 04-08-2012 (DDMMYYYY).


// Hendrup

Thursday, July 26, 2012

Difference in Pitchers

Two different pitchers

I have been steaming in about 1,5 years with my steel series pitcher off 0,35 L. pitcher, which until now have been more than enough - but in that period I had never been relatively close to pouring some great latte art. I have always thought and blamed my previous espresso machine, the Francis Francis X1, which definitely had a thing or two to do with it - but never my pitcher.


Unknown 0,35 L. pitcher

This lead me straight to watching online latte art videos and reading endless articles off the dos and don´ts. Therefore I currently upgraded my espresso machine and thought all would be in order and it sort of was, I was producing some great micro foam, but didn't get the pour right. You are thinking which cup are you pouring in, because it does matter if the bottom of the glass/cup is curved or flat - and Im currently using a glass with a flat bottom.

But I was at once chatting my way at the local coffee shop and saw the Motta pitcher, which was a lot heavier than my current pitcher and also had a better designed spout. I was also introduced to the fact that the latte art champion Chris Loukakis always uses this exact pitcher, therefore I had too try it.

Motta 0,35 L. pitcher

To be absolutely precise the weight difference between the two pitchers is 77 gr., which when you are holding the pitcher fells like a lot. The steel series pitcher weighs 137 gr. and the Motta pitcher weighs 214 gr. - both off them is a 0,35 L. pitcher.

Did it help me out regarding to the latte art problems? Well actually the milk was a bit more easy to steam in the Motta pitcher than the unknown pitcher, because it is formed more cone like. More importantly the spout makes a huge difference, when talking latte art - you have more control upon the milk flow and can actually draw upon the foam surface, where the unknown pitcher just dumps the milk. But a true con and the only to the Motta pitcher, is that its more heat resistant - meaning that the sides of metal is a lot thicker and therefore takes more time to adjust to the milk temperature inside. So if you are using the side of the pitcher to get a hold off how the temperature is rising, then you will be better off with the unknown pitcher.


// Hendrup


Monday, July 23, 2012

VST Baskets, introdution

VST Precision Competition Filter Boxes

Veteran Italian espresso machine manufacturer La Marzocco teame up with VST, designers of the popular ExtractMoJo device to produce a more accurate, more consistent way of extracting espresso shots. When put under the microscope (or even looking with your naked eye) espresso filter baskets are manufactured such that the holes vary not only in size, but also in shape.

VST Precision Competition Filter 20 gr. Filter Box


VST filter baskets are manufactured with much lower tolerances, such that each and every hole is measured on every filter to ensure that they are all within a diameter limit of +/- 30 µm. That is, 30 microns, where a micron is 1/1000 of a millimeter. All VST filter basket holes are measured for a number of different parameters to ensure consistency, including circularity, area, placement and also checked that no holes are completely blocked. As you can imagine, the manufacturing process involved in the development of the VST filter took some time. Each VST filter is warranted for zero defects. 


Included documentation in the two boxes


The VST filter also has much straighter sides top to bottom than some other brands, and the holes run closer to the edge of the filter. They are designed this way to ensure the water travels the same distance on the edge of the filter as it does in the middle, aiding in achieving consistent espresso extraction across the coffee puck.

VST filters allow for better consistency and this also means poor technique such as uneven tamping will show through in the shot. And so the VST becomes not only great for achieving better espresso day-to-day, but also for training purposes. Just as the naked portafilter allowed the Barista to see the extraction, the VST filter helps the Barista to further improve tamp and dosing technique.


The different VST baskets from varies angles


There are obvious caveats here - your technique must be reasonably good. You don't need to be a world Barista champion to get a lot out of the VST baskets, but you do need to tamp evenly and dose consistently, as with any espresso basket - perhaps more so with the VST.

You may find you need to grind a little finer than with other baskets, since there are more holes. In general, many respected coffee professionals agree that espresso extracted will through the VST baskets tastes better. Some say it brings out more distinct flavors in the coffee. Extractions tend to be consistent not only shot to shot, but between different VST baskets, since they are all virtually identical.


Espresso shot using the 20 gr. VST Basket


Since VST baskets are still relatively new, you may still be using the portafilter basket which came with your espresso machine and thats okay - but if you wanted to try something new which could noticeably improve the taste and consistency of your espresso coffee at home, then VST baskets are worth a shot. 


Comparison between a standard and a VST basket


Trying to decide which size you should buy? VST filters should fit into most standard 58mm naked portafilters, while 15gr. and 18 gr. should fit most spouted portafilters. If deciding between the three VST basket sizes (15 gr., 18 gr., 20 gr. and 22 gr.), its helpful to know how mush coffee you currently dose into your existing basket. If you have digital scales, weigh your standard dose. Most double baskets fit at least 18 gr. of coffee, while a triple can fit 22 gr. or more. With this in mind, choosing between the VST filter basket sizes is relatively straight forward. The 18 gr. VST seems to be the most popular size, and is great for a single shot of good strength. 

According to VST, the 18 gr. basket is 24.2 mm high, while the 22 gr. basket is 28 mm high. If you use a spouted portafilter, be sure to measure your existing basket so you have some idea of which size VST will fit. Obviously, all three sizes should fit in most naked portafilters.


// Hendrup